看着有几个小伙伴在问小程序支不支持百度小程序,理论上uniapp可以编译到任一端,但是由于博客小程序中有登录等功能,所以还需要做一些兼容,之前我只写了QQ与微信两端的登录,今天给大家写一下如何接入百度小程序的登录,看过之后或许大家也可以尝试做抖音、快手等小程序的登录。
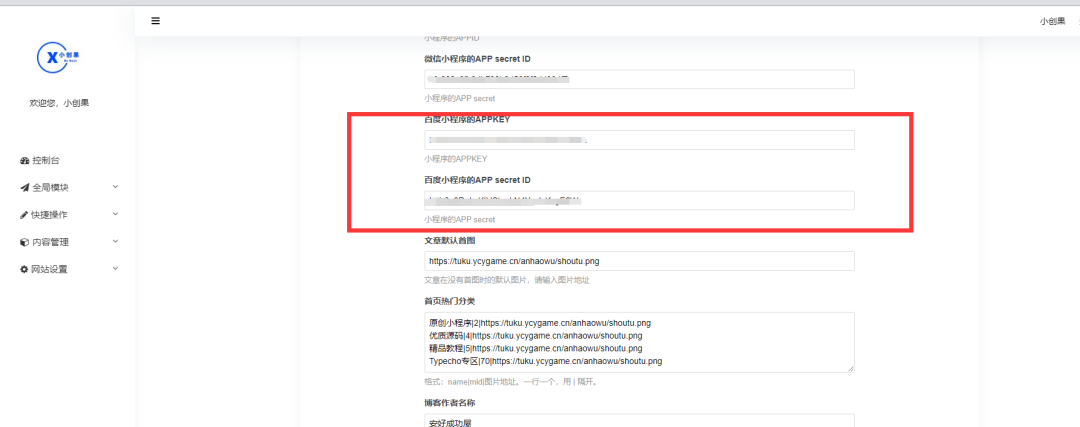
先在typecho插件后台添加相关百度小程序Key和AppSecret的输入框

如上图所示的输入框就是需要添加的内容,这主要是为了方便用户去直接输入。想要添加该文本框,只需要在插件源码中Plugin.php中加入以下代码即可:
$bdappkey = new Typecho_Widget_Helper_Form_Element_Text('bdappkey', NULL, 'xxx', _t('百度小程序的APPKEY'),  _t('小程序的APPKEY'));
$form->addInput($bdappkey);
$bdappSecret = new Typecho_Widget_Helper_Form_Element_Text('bdappSecret', NULL, 'xxx', _t('百度小程序的APP secret ID'),  _t('小程序的APP secret'));
$form->addInput($bdappSecret);
然后在Action.php文件中导入之前的变量和编写百度小程序登录函数,导入输入框的变量只需要在该文件中的上方加入如下代码:
$this->bdappkey = Typecho_Widget::widget('Widget_Options')->plugin('Pisces')->bdappkey;
$this->bdappSecret = Typecho_Widget::widget('Widget_Options')->plugin('Pisces')->bdappSecret;
百度小程序登录的函数,如下代码:
private function BDlogin()
{
        $sec = self::GET('apisec', 'null');
        self::checkApisec($sec);

        $code = self::GET('code', 'null');
        if($code != 'null')
        {
            $nickname = self::GET('nickname', 'null');
            $avatarUrl = self::GET('avatarUrl', 'null');
            $gender = self::GET('gender', 'null');
            $province = self::GET('province', 'null');

            $url = sprintf('https://spapi.baidu.com/oauth/jscode2sessionkey?code=%s&client_id=%s&sk=%s',$code,$this->bdappkey,$this->bdappSecret);
            $info = file_get_contents($url);
            $json = json_decode($info);//对json数据解码
            $arr = get_object_vars($json);
            $openid = $arr['openid'];
            if( $openid != null && $openid != '' ) {
                $row = $this->db->fetchRow($this->db->select('openid','lastlogin')->from('table.pisces')->where('openid = ?', $openid));
                //已存在的用户,更新上次登录时间
                if(sizeof($row)>0) {
                    $this->db->query($this->db->update('table.pisces')->rows(array('lastlogin' => time()))->where('openid = ?', $openid));
                    $this->export($openid);
                }
                else {
                    //新用户
                    $this->db->query($this->db->insert('table.pisces')->rows(array('openid' => $openid, 'createtime' => time(), 'lastlogin' => time(),
                        'nickname' => $nickname, 'avatarUrl' => $avatarUrl, 'city' => $city, 'country' => $country,
                        'gender' => $gender, 'province' => $province, 'type'=>'百度','points'=>0)));
                    $this->export($openid);
                }
            } else {
                $this->export('none');
            }
        }
        else
        {
            $this->export("error code");
        }
这样插件端就算完成了,接下来做一下前端的修改。
首先因为百度小程序获取用户信息的方式仍旧是通过按钮点击获取,所以我们可以直接通过条件编译写一个符合百度小程序规则的按钮,然后绑定登录事件,不过为了方便用户网络请求我们先在小程序封装的api.js(在uniapp源码的文件utils文件夹中)中封装以下百度小程序的登录Url。代码如下:
BDLogin: function(userInfo) {
    return this.appendAPISEC(API_URL + 'BDlogin?code=' + userInfo.code + '&nickname=' + userInfo.nickName + '&avatarUrl=' +
      userInfo.avatarUrl + '&city=' + userInfo.city + '&country=' + userInfo.country + '&gender=' + userInfo.gender +
      '&province=' + userInfo.province);
  },
然后是mine.vue文件中的代码,通过条件编译写出按钮:
<!-- #ifndef MP-BAIDU -->
      <button @click="getuserinfo">点击登录</button>
<!-- #endif -->
<!-- #ifdef MP-BAIDU -->
       <button  open-type="getUserInfo" @getuserinfo="getBaiduUserInfo">
              点击登录
      </button>
<!-- #endif -->
ifndef里面的是之前的小程序用到的按钮,下面的是百度小程序所需要用到的按钮,既然重新定义事件了,那也不用兼容了,直接重新在写一个百度小程序的登录事件,代码如下:
getBaiduUserInfo:function(e){
      uni.showLoading({
        title:"登录中"
      })
      let userInfo = e.detail.userInfo;
      this.userInfo = userInfo;
      uni.login({
        success: res => {
          console.log(res);
          userInfo.code = res.code;
          console.log(userInfo)
          uni.request({
            url:API.BDLogin(userInfo),
            success: (res) => {
              console.log(res)
              uni.hideLoading();
              this.userInfo.openid = res.data.data;
              uni.setStorageSync('isLogin', true);
              this.isLogin = true;
              uni.setStorageSync('userInfo', this.userInfo);
              uni.setStorageSync('openid', this.userInfo.openid);
            }

          })
        }
      });
    },
以上就是完成的接入过程了,按照步骤来的话还是比较简单的。
本文来自投稿,不代表本站立场,如若转载,请注明出处:https://www.i4qq.com/jpjc/typechoxcxjrbdxxjc.html
